Deprecated: Creation of dynamic property WP_Term::$term_order is deprecated in /homepages/9/d495490788/htdocs/ouradvanture.com/wp-includes/class-wp-term.php on line 198
Deprecated: Creation of dynamic property WP_Term::$cat_ID is deprecated in /homepages/9/d495490788/htdocs/ouradvanture.com/wp-includes/category.php on line 378
Deprecated: Creation of dynamic property WP_Term::$category_count is deprecated in /homepages/9/d495490788/htdocs/ouradvanture.com/wp-includes/category.php on line 379
Deprecated: Creation of dynamic property WP_Term::$category_description is deprecated in /homepages/9/d495490788/htdocs/ouradvanture.com/wp-includes/category.php on line 380
Deprecated: Creation of dynamic property WP_Term::$cat_name is deprecated in /homepages/9/d495490788/htdocs/ouradvanture.com/wp-includes/category.php on line 381
Deprecated: Creation of dynamic property WP_Term::$category_nicename is deprecated in /homepages/9/d495490788/htdocs/ouradvanture.com/wp-includes/category.php on line 382
Deprecated: Creation of dynamic property WP_Term::$category_parent is deprecated in /homepages/9/d495490788/htdocs/ouradvanture.com/wp-includes/category.php on line 383
Deprecated: Using ${var} in strings is deprecated, use {$var} instead in /homepages/9/d495490788/htdocs/ouradvanture.com/wp-content/themes/Divi/includes/builder/module/settings/migration/ColumnOptions.php on line 94
Deprecated: Using ${var} in strings is deprecated, use {$var} instead in /homepages/9/d495490788/htdocs/ouradvanture.com/wp-content/themes/Divi/includes/builder/module/settings/migration/ColumnOptions.php on line 94
Deprecated: Using ${var} in strings is deprecated, use {$var} instead in /homepages/9/d495490788/htdocs/ouradvanture.com/wp-content/themes/Divi/includes/builder/module/settings/migration/ColumnOptions.php on line 96
Deprecated: Using ${var} in strings is deprecated, use {$var} instead in /homepages/9/d495490788/htdocs/ouradvanture.com/wp-content/themes/Divi/includes/builder/module/settings/migration/ColumnOptions.php on line 96
Deprecated: Using ${var} in strings is deprecated, use {$var} instead in /homepages/9/d495490788/htdocs/ouradvanture.com/wp-content/themes/Divi/includes/builder/module/settings/migration/ColumnOptions.php on line 102
Deprecated: Using ${var} in strings is deprecated, use {$var} instead in /homepages/9/d495490788/htdocs/ouradvanture.com/wp-content/themes/Divi/includes/builder/module/settings/migration/ColumnOptions.php on line 102
Deprecated: Using ${var} in strings is deprecated, use {$var} instead in /homepages/9/d495490788/htdocs/ouradvanture.com/wp-content/themes/Divi/includes/builder/module/settings/migration/ColumnOptions.php on line 104
Deprecated: Using ${var} in strings is deprecated, use {$var} instead in /homepages/9/d495490788/htdocs/ouradvanture.com/wp-content/themes/Divi/includes/builder/module/settings/migration/ColumnOptions.php on line 104
Deprecated: Using ${var} in strings is deprecated, use {$var} instead in /homepages/9/d495490788/htdocs/ouradvanture.com/wp-content/themes/Divi/includes/builder/module/settings/migration/ColumnOptions.php on line 129
Deprecated: Using ${var} in strings is deprecated, use {$var} instead in /homepages/9/d495490788/htdocs/ouradvanture.com/wp-content/themes/Divi/includes/builder/module/settings/migration/ColumnOptions.php on line 129
Deprecated: Using ${var} in strings is deprecated, use {$var} instead in /homepages/9/d495490788/htdocs/ouradvanture.com/wp-content/themes/Divi/includes/builder/module/settings/migration/ColumnOptions.php on line 131
Deprecated: Using ${var} in strings is deprecated, use {$var} instead in /homepages/9/d495490788/htdocs/ouradvanture.com/wp-content/themes/Divi/includes/builder/module/settings/migration/ColumnOptions.php on line 131
Deprecated: Using ${var} in strings is deprecated, use {$var} instead in /homepages/9/d495490788/htdocs/ouradvanture.com/wp-content/themes/Divi/includes/builder/module/settings/migration/ColumnOptions.php on line 160
Deprecated: Using ${var} in strings is deprecated, use {$var} instead in /homepages/9/d495490788/htdocs/ouradvanture.com/wp-content/themes/Divi/includes/builder/module/settings/migration/ColumnOptions.php on line 160
Deprecated: Using ${var} in strings is deprecated, use {$var} instead in /homepages/9/d495490788/htdocs/ouradvanture.com/wp-content/themes/Divi/includes/builder/module/settings/migration/ColumnOptions.php on line 160
Deprecated: Using ${var} in strings is deprecated, use {$var} instead in /homepages/9/d495490788/htdocs/ouradvanture.com/wp-content/themes/Divi/includes/builder/module/settings/migration/ColumnOptions.php on line 161
Deprecated: Using ${var} in strings is deprecated, use {$var} instead in /homepages/9/d495490788/htdocs/ouradvanture.com/wp-content/themes/Divi/includes/builder/module/settings/migration/ColumnOptions.php on line 161
Deprecated: Using ${var} in strings is deprecated, use {$var} instead in /homepages/9/d495490788/htdocs/ouradvanture.com/wp-content/themes/Divi/includes/builder/module/settings/migration/ColumnOptions.php on line 161
Deprecated: Using ${var} in strings is deprecated, use {$var} instead in /homepages/9/d495490788/htdocs/ouradvanture.com/wp-content/themes/Divi/includes/builder/module/settings/migration/ColumnOptions.php on line 204
Deprecated: Using ${var} in strings is deprecated, use {$var} instead in /homepages/9/d495490788/htdocs/ouradvanture.com/wp-content/themes/Divi/includes/builder/module/settings/migration/ColumnOptions.php on line 204
Deprecated: Using ${var} in strings is deprecated, use {$var} instead in /homepages/9/d495490788/htdocs/ouradvanture.com/wp-content/themes/Divi/includes/builder/module/settings/migration/ColumnOptions.php on line 204
Deprecated: Using ${var} in strings is deprecated, use {$var} instead in /homepages/9/d495490788/htdocs/ouradvanture.com/wp-content/themes/Divi/includes/builder/module/settings/migration/ColumnOptions.php on line 204
Deprecated: Using ${var} in strings is deprecated, use {$var} instead in /homepages/9/d495490788/htdocs/ouradvanture.com/wp-content/themes/Divi/includes/builder/module/settings/migration/ColumnOptions.php on line 206
Deprecated: Using ${var} in strings is deprecated, use {$var} instead in /homepages/9/d495490788/htdocs/ouradvanture.com/wp-content/themes/Divi/includes/builder/module/settings/migration/ColumnOptions.php on line 206
Deprecated: Using ${var} in strings is deprecated, use {$var} instead in /homepages/9/d495490788/htdocs/ouradvanture.com/wp-content/themes/Divi/includes/builder/module/settings/migration/ColumnOptions.php on line 206
Deprecated: Creation of dynamic property ET_Builder_Module_Field_Border::$template is deprecated in /homepages/9/d495490788/htdocs/ouradvanture.com/wp-content/themes/Divi/includes/builder/module/field/Border.php on line 48
Deprecated: Using ${var} in strings is deprecated, use {$var} instead in /homepages/9/d495490788/htdocs/ouradvanture.com/wp-content/themes/Divi/includes/builder/module/field/Position.php on line 198
Deprecated: Using ${var} in strings is deprecated, use {$var} instead in /homepages/9/d495490788/htdocs/ouradvanture.com/wp-content/themes/Divi/includes/builder/module/field/Position.php on line 199
Deprecated: Using ${var} in strings is deprecated, use {$var} instead in /homepages/9/d495490788/htdocs/ouradvanture.com/wp-content/themes/Divi/includes/builder/module/field/Position.php on line 200
Deprecated: Using ${var} in strings is deprecated, use {$var} instead in /homepages/9/d495490788/htdocs/ouradvanture.com/wp-content/themes/Divi/includes/builder/module/field/Position.php on line 499
Deprecated: Using ${var} in strings is deprecated, use {$var} instead in /homepages/9/d495490788/htdocs/ouradvanture.com/wp-content/themes/Divi/includes/builder/module/field/Position.php on line 582
Deprecated: Using ${var} in strings is deprecated, use {$var} instead in /homepages/9/d495490788/htdocs/ouradvanture.com/wp-content/themes/Divi/includes/builder/module/field/Transform.php on line 79
Deprecated: Using ${var} in strings is deprecated, use {$var} instead in /homepages/9/d495490788/htdocs/ouradvanture.com/wp-content/themes/Divi/includes/builder/module/field/Transform.php on line 79
Deprecated: Using ${var} in strings is deprecated, use {$var} instead in /homepages/9/d495490788/htdocs/ouradvanture.com/wp-content/themes/Divi/includes/builder/module/field/Transform.php on line 98
Deprecated: Using ${var} in strings is deprecated, use {$var} instead in /homepages/9/d495490788/htdocs/ouradvanture.com/wp-content/themes/Divi/includes/builder/module/field/Transform.php on line 98
Deprecated: Using ${var} in strings is deprecated, use {$var} instead in /homepages/9/d495490788/htdocs/ouradvanture.com/wp-content/themes/Divi/includes/builder/module/field/Transform.php on line 117
Deprecated: Using ${var} in strings is deprecated, use {$var} instead in /homepages/9/d495490788/htdocs/ouradvanture.com/wp-content/themes/Divi/includes/builder/module/field/Transform.php on line 117
Deprecated: Using ${var} in strings is deprecated, use {$var} instead in /homepages/9/d495490788/htdocs/ouradvanture.com/wp-content/themes/Divi/includes/builder/module/field/Transform.php on line 117
Deprecated: Using ${var} in strings is deprecated, use {$var} instead in /homepages/9/d495490788/htdocs/ouradvanture.com/wp-content/themes/Divi/includes/builder/module/field/Transform.php on line 136
Deprecated: Using ${var} in strings is deprecated, use {$var} instead in /homepages/9/d495490788/htdocs/ouradvanture.com/wp-content/themes/Divi/includes/builder/module/field/Transform.php on line 136
Deprecated: Using ${var} in strings is deprecated, use {$var} instead in /homepages/9/d495490788/htdocs/ouradvanture.com/wp-content/themes/Divi/includes/builder/module/field/Transform.php on line 157
Deprecated: Using ${var} in strings is deprecated, use {$var} instead in /homepages/9/d495490788/htdocs/ouradvanture.com/wp-content/themes/Divi/includes/builder/module/field/Transform.php on line 157
Deprecated: Using ${var} in strings is deprecated, use {$var} instead in /homepages/9/d495490788/htdocs/ouradvanture.com/wp-content/themes/Divi/includes/builder/module/field/Transform.php on line 199
Deprecated: Using ${var} in strings is deprecated, use {$var} instead in /homepages/9/d495490788/htdocs/ouradvanture.com/wp-content/themes/Divi/includes/builder/module/field/Transform.php on line 200
Deprecated: Using ${var} in strings is deprecated, use {$var} instead in /homepages/9/d495490788/htdocs/ouradvanture.com/wp-content/themes/Divi/includes/builder/module/field/Transform.php on line 201
Deprecated: Using ${var} in strings is deprecated, use {$var} instead in /homepages/9/d495490788/htdocs/ouradvanture.com/wp-content/themes/Divi/includes/builder/module/field/Transform.php on line 203
Deprecated: Using ${var} in strings is deprecated, use {$var} instead in /homepages/9/d495490788/htdocs/ouradvanture.com/wp-content/themes/Divi/includes/builder/module/field/Transform.php on line 204
Deprecated: Using ${var} in strings is deprecated, use {$var} instead in /homepages/9/d495490788/htdocs/ouradvanture.com/wp-content/themes/Divi/includes/builder/module/field/Transform.php on line 205
Deprecated: Using ${var} in strings is deprecated, use {$var} instead in /homepages/9/d495490788/htdocs/ouradvanture.com/wp-content/themes/Divi/includes/builder/module/field/Transform.php on line 206
Deprecated: Using ${var} in strings is deprecated, use {$var} instead in /homepages/9/d495490788/htdocs/ouradvanture.com/wp-content/themes/Divi/includes/builder/module/field/Transform.php on line 207
Deprecated: Using ${var} in strings is deprecated, use {$var} instead in /homepages/9/d495490788/htdocs/ouradvanture.com/wp-content/themes/Divi/includes/builder/module/field/Transform.php on line 364
Deprecated: Using ${var} in strings is deprecated, use {$var} instead in /homepages/9/d495490788/htdocs/ouradvanture.com/wp-content/themes/Divi/includes/builder/module/field/Transform.php on line 364
Deprecated: Using ${var} in strings is deprecated, use {$var} instead in /homepages/9/d495490788/htdocs/ouradvanture.com/wp-content/themes/Divi/includes/builder/module/field/Transform.php on line 565
Deprecated: Creation of dynamic property ET_Builder_Module_Helper_MultiViewOptions::$inherited_props is deprecated in /homepages/9/d495490788/htdocs/ouradvanture.com/wp-content/themes/Divi/includes/builder/module/helpers/MultiViewOptions.php on line 686
Deprecated: Creation of dynamic property ET_Builder_Module_Field_Divider::$count is deprecated in /homepages/9/d495490788/htdocs/ouradvanture.com/wp-content/themes/Divi/includes/builder/main-structure-elements.php on line 1181
Deprecated: Creation of dynamic property ET_Builder_Module_Fullwidth_Header::$fullwidth is deprecated in /homepages/9/d495490788/htdocs/ouradvanture.com/wp-content/themes/Divi/includes/builder/class-et-builder-element.php on line 1312
Deprecated: Creation of dynamic property ET_Builder_Module_Fullwidth_Header::$text_shadow is deprecated in /homepages/9/d495490788/htdocs/ouradvanture.com/wp-content/themes/Divi/includes/builder/class-et-builder-element.php on line 1312
Deprecated: Creation of dynamic property ET_Builder_Module_Fullwidth_Header::$margin_padding is deprecated in /homepages/9/d495490788/htdocs/ouradvanture.com/wp-content/themes/Divi/includes/builder/class-et-builder-element.php on line 1312
Deprecated: Creation of dynamic property ET_Builder_Module_Fullwidth_Header::$_additional_fields_options is deprecated in /homepages/9/d495490788/htdocs/ouradvanture.com/wp-content/themes/Divi/includes/builder/class-et-builder-element.php on line 1312
Deprecated: Creation of dynamic property ET_Builder_Module_Helper_MultiViewOptions::$inherited_props is deprecated in /homepages/9/d495490788/htdocs/ouradvanture.com/wp-content/themes/Divi/includes/builder/module/helpers/MultiViewOptions.php on line 686
Deprecated: Creation of dynamic property ET_Builder_Module_Helper_MultiViewOptions::$inherited_props is deprecated in /homepages/9/d495490788/htdocs/ouradvanture.com/wp-content/themes/Divi/includes/builder/module/helpers/MultiViewOptions.php on line 686
Deprecated: Creation of dynamic property ET_Builder_Module_Text::$text_shadow is deprecated in /homepages/9/d495490788/htdocs/ouradvanture.com/wp-content/themes/Divi/includes/builder/class-et-builder-element.php on line 1312
Deprecated: Creation of dynamic property ET_Builder_Module_Text::$margin_padding is deprecated in /homepages/9/d495490788/htdocs/ouradvanture.com/wp-content/themes/Divi/includes/builder/class-et-builder-element.php on line 1312
Deprecated: Creation of dynamic property ET_Builder_Module_Text::$_additional_fields_options is deprecated in /homepages/9/d495490788/htdocs/ouradvanture.com/wp-content/themes/Divi/includes/builder/class-et-builder-element.php on line 1312
Deprecated: Creation of dynamic property ET_Builder_Module_Helper_MultiViewOptions::$inherited_props is deprecated in /homepages/9/d495490788/htdocs/ouradvanture.com/wp-content/themes/Divi/includes/builder/module/helpers/MultiViewOptions.php on line 686
Deprecated: Creation of dynamic property ET_Builder_Module_Helper_MultiViewOptions::$inherited_props is deprecated in /homepages/9/d495490788/htdocs/ouradvanture.com/wp-content/themes/Divi/includes/builder/module/helpers/MultiViewOptions.php on line 686
Deprecated: Creation of dynamic property ET_Builder_Module_Helper_MultiViewOptions::$inherited_props is deprecated in /homepages/9/d495490788/htdocs/ouradvanture.com/wp-content/themes/Divi/includes/builder/module/helpers/MultiViewOptions.php on line 686
Toilet & Shower - Sprinter Van Conversion
I think a place to pee, poo & shower is a must, what do you do when its freezing outside and you need to go in the middle of night? Yeah you carry your toilet, makes sense. It takes up a lot of space but its essential. (The toilet more than the shower!)

The toilet we fitted is a Thetford Cassette type, it has a flush that pulls water from the main water tank under the van. The waste drops into a cassette that can be accessed from a hatch.. Simply slide and dump!
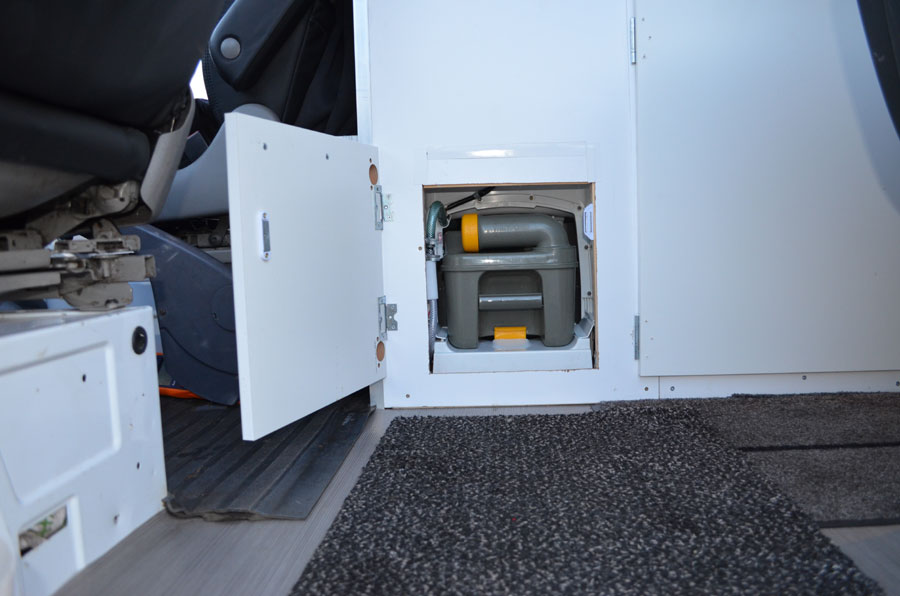
A moulded integrated shower tray is available for this toilet. It made life a little easer when it can to building the shower/toilet room, installing the plumbing.. Well worth buying one if your going for this type of Thetford toilet.

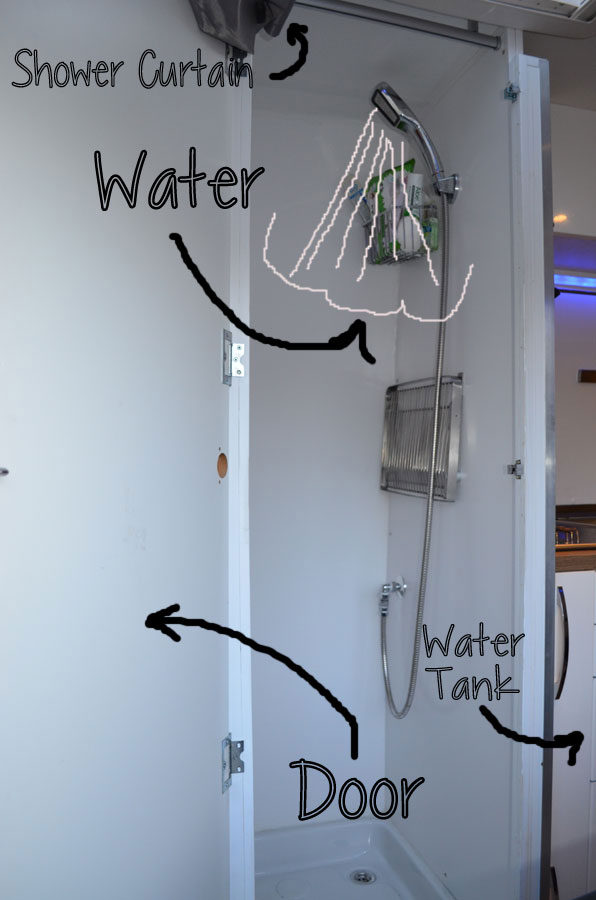
The cubical was built using stud walls and lined with 3mm ply coated in PVC helping to keep the water in the cubical and down the drain.
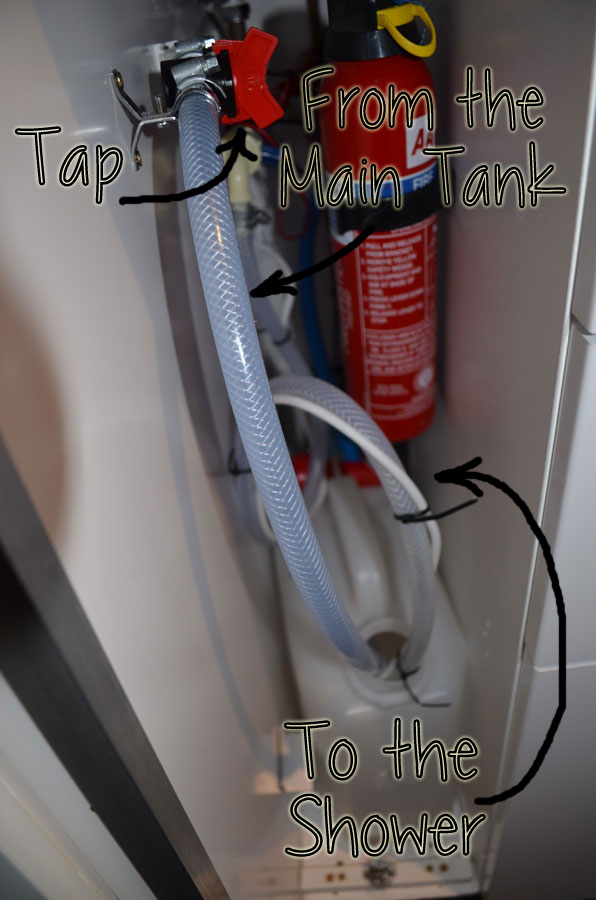
The shower is not necessary but good to have. I wanted a Eberspächer water and air heater but the unit is huge, the idea had to be ditched. The solution we used was a 10ltr water container, a submersible Whale pump that can be turned on and off when having a shower delivering water to the shower head. The water container can be refilled from the main tank under the van, controlled by the big red tap shown in the picture.
The ratio of cold to hot water for the perfect shower 4 litres of cold to 2 litres of boiling water makes for a steamy shower, more hot water may be needed in the winter. We use a small funnel to fill up the with hot water. 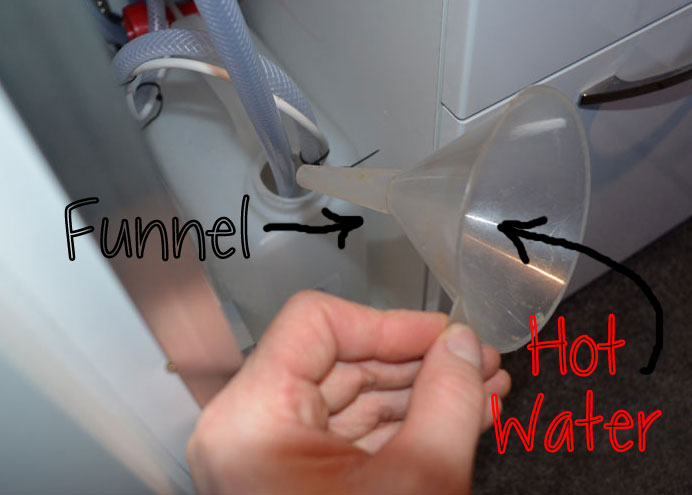
Overall it works quite well. 7ish litres of water gives you about 4 minutes water flow time, which is long enough to get wet, turn the water off soap up and then rinse.
Deprecated: Creation of dynamic property WP_Term::$term_order is deprecated in /homepages/9/d495490788/htdocs/ouradvanture.com/wp-includes/class-wp-term.php on line 198
Deprecated: Creation of dynamic property WP_Term::$cat_ID is deprecated in /homepages/9/d495490788/htdocs/ouradvanture.com/wp-includes/category.php on line 378
Deprecated: Creation of dynamic property WP_Term::$category_count is deprecated in /homepages/9/d495490788/htdocs/ouradvanture.com/wp-includes/category.php on line 379
Deprecated: Creation of dynamic property WP_Term::$category_description is deprecated in /homepages/9/d495490788/htdocs/ouradvanture.com/wp-includes/category.php on line 380
Deprecated: Creation of dynamic property WP_Term::$cat_name is deprecated in /homepages/9/d495490788/htdocs/ouradvanture.com/wp-includes/category.php on line 381
Deprecated: Creation of dynamic property WP_Term::$category_nicename is deprecated in /homepages/9/d495490788/htdocs/ouradvanture.com/wp-includes/category.php on line 382
Deprecated: Creation of dynamic property WP_Term::$category_parent is deprecated in /homepages/9/d495490788/htdocs/ouradvanture.com/wp-includes/category.php on line 383
Deprecated: Creation of dynamic property ET_Builder_Module_Helper_MultiViewOptions::$inherited_props is deprecated in /homepages/9/d495490788/htdocs/ouradvanture.com/wp-content/themes/Divi/includes/builder/module/helpers/MultiViewOptions.php on line 686
Deprecated: Creation of dynamic property ET_Builder_Module_Helper_MultiViewOptions::$inherited_props is deprecated in /homepages/9/d495490788/htdocs/ouradvanture.com/wp-content/themes/Divi/includes/builder/module/helpers/MultiViewOptions.php on line 686
Deprecated: Creation of dynamic property ET_Builder_Module_Helper_MultiViewOptions::$inherited_props is deprecated in /homepages/9/d495490788/htdocs/ouradvanture.com/wp-content/themes/Divi/includes/builder/module/helpers/MultiViewOptions.php on line 686
Deprecated: Creation of dynamic property ET_Builder_Module_Helper_MultiViewOptions::$inherited_props is deprecated in /homepages/9/d495490788/htdocs/ouradvanture.com/wp-content/themes/Divi/includes/builder/module/helpers/MultiViewOptions.php on line 686
Deprecated: Creation of dynamic property ET_Builder_Module_Helper_MultiViewOptions::$inherited_props is deprecated in /homepages/9/d495490788/htdocs/ouradvanture.com/wp-content/themes/Divi/includes/builder/module/helpers/MultiViewOptions.php on line 686
Deprecated: Creation of dynamic property ET_Builder_Module_Helper_MultiViewOptions::$inherited_props is deprecated in /homepages/9/d495490788/htdocs/ouradvanture.com/wp-content/themes/Divi/includes/builder/module/helpers/MultiViewOptions.php on line 686
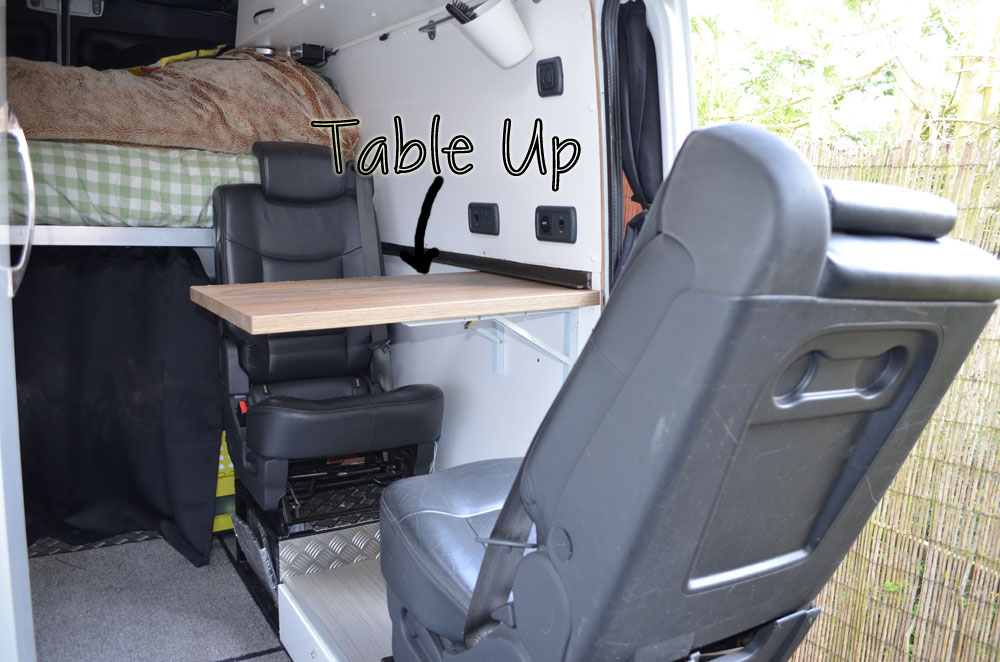
The Table - Sprinter Van Conversion
This space needed to be multifunctional, a table that folds away was the best option for us, also the idea of having to fit a support leg every time it was needed did not appeal to me at all, it would be a pain the ass, plus you have to find a place to hide the leg when not in use!

An off cut from the kitchen work top was used to make the table, (From Ikea.) I needed a way to support the table when up and folded away when 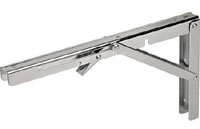 not in use. The boating community has this problems covered a collapsible table support bracket.
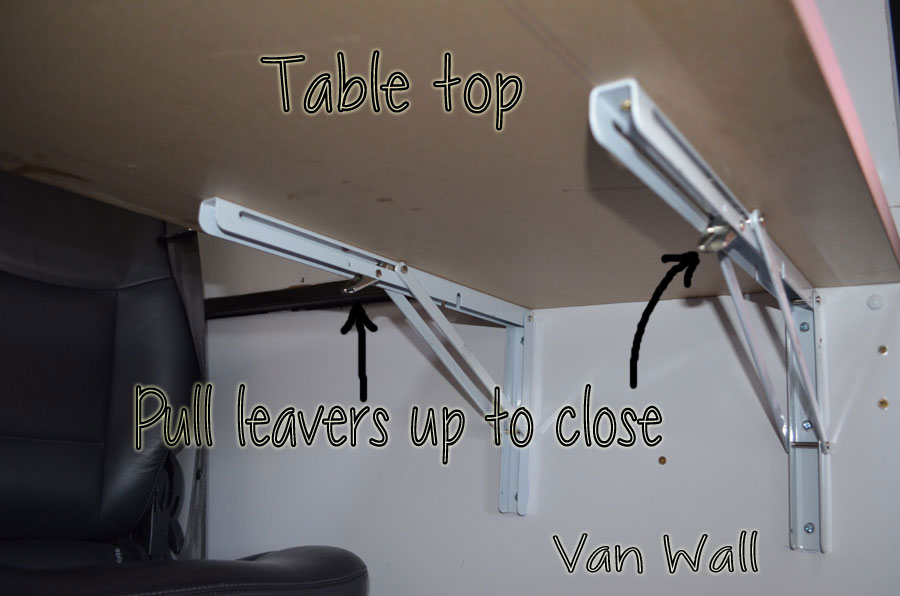
Cut the table top to size, screw the table top to the brackets and screw to the wall, the wall needs to be quite strong otherwise you will have a flexing table.. not good… One more thing the brackets must be screwed on to the table straight if not it will not fold into its self.
Deprecated: Creation of dynamic property WP_Term::$term_order is deprecated in /homepages/9/d495490788/htdocs/ouradvanture.com/wp-includes/class-wp-term.php on line 198
Deprecated: Creation of dynamic property WP_Term::$cat_ID is deprecated in /homepages/9/d495490788/htdocs/ouradvanture.com/wp-includes/category.php on line 378
Deprecated: Creation of dynamic property WP_Term::$category_count is deprecated in /homepages/9/d495490788/htdocs/ouradvanture.com/wp-includes/category.php on line 379
Deprecated: Creation of dynamic property WP_Term::$category_description is deprecated in /homepages/9/d495490788/htdocs/ouradvanture.com/wp-includes/category.php on line 380
Deprecated: Creation of dynamic property WP_Term::$cat_name is deprecated in /homepages/9/d495490788/htdocs/ouradvanture.com/wp-includes/category.php on line 381
Deprecated: Creation of dynamic property WP_Term::$category_nicename is deprecated in /homepages/9/d495490788/htdocs/ouradvanture.com/wp-includes/category.php on line 382
Deprecated: Creation of dynamic property WP_Term::$category_parent is deprecated in /homepages/9/d495490788/htdocs/ouradvanture.com/wp-includes/category.php on line 383
Deprecated: Creation of dynamic property ET_Builder_Module_Helper_MultiViewOptions::$inherited_props is deprecated in /homepages/9/d495490788/htdocs/ouradvanture.com/wp-content/themes/Divi/includes/builder/module/helpers/MultiViewOptions.php on line 686
Deprecated: Creation of dynamic property ET_Builder_Module_Helper_MultiViewOptions::$inherited_props is deprecated in /homepages/9/d495490788/htdocs/ouradvanture.com/wp-content/themes/Divi/includes/builder/module/helpers/MultiViewOptions.php on line 686
Deprecated: Creation of dynamic property ET_Builder_Module_Helper_MultiViewOptions::$inherited_props is deprecated in /homepages/9/d495490788/htdocs/ouradvanture.com/wp-content/themes/Divi/includes/builder/module/helpers/MultiViewOptions.php on line 686
Deprecated: Creation of dynamic property ET_Builder_Module_Helper_MultiViewOptions::$inherited_props is deprecated in /homepages/9/d495490788/htdocs/ouradvanture.com/wp-content/themes/Divi/includes/builder/module/helpers/MultiViewOptions.php on line 686
Deprecated: Creation of dynamic property ET_Builder_Module_Helper_MultiViewOptions::$inherited_props is deprecated in /homepages/9/d495490788/htdocs/ouradvanture.com/wp-content/themes/Divi/includes/builder/module/helpers/MultiViewOptions.php on line 686
Deprecated: Creation of dynamic property ET_Builder_Module_Helper_MultiViewOptions::$inherited_props is deprecated in /homepages/9/d495490788/htdocs/ouradvanture.com/wp-content/themes/Divi/includes/builder/module/helpers/MultiViewOptions.php on line 686
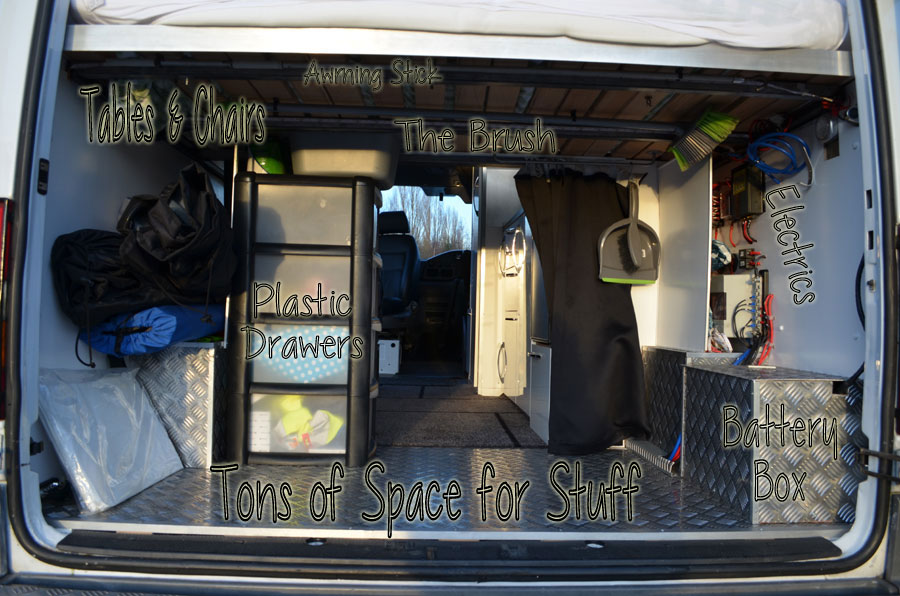
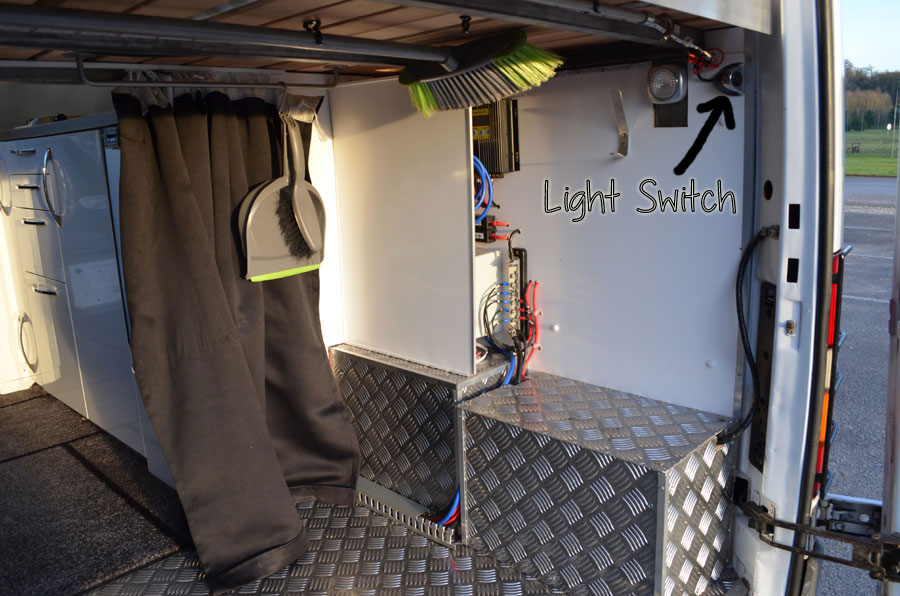
The Garage - Sprinter Van Conversion
We wanted a space to store those bits and bobs that do not belong in the house, like the stuff you keep in the garage! To name a few:
- Tables and chairs.
- Extra food and wine.
- Wood and coal
- Tools / rope
- Brush
- Curved retaining armature stick used to unwind the awning
- Battery and electronics
We decided to leave the boot open so we can carry longer items when we’re not on the road, like going to B&Q picking up a pack of 2×3… We fitted a set of plastic drawers that we use to keep our clothes in. It worked, so the drawers have stayed.
The height of the boot comes to 90cm which is just high enough to ft two large storage boxes stacked.
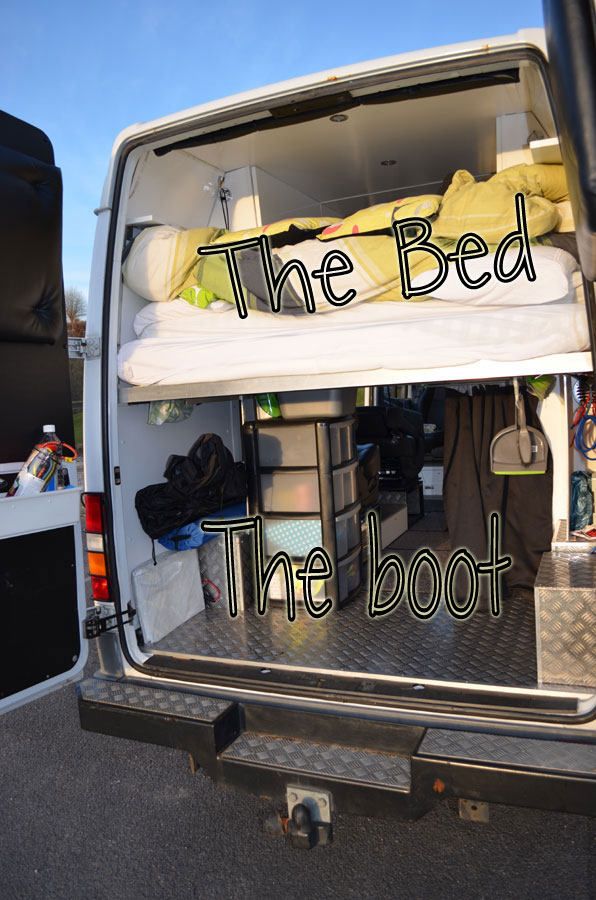
When darkness arrives I’ve used a LED strip with a sticky back then attached to the underside of the bed, the LED’s are controlled by a switch.
Deprecated: Creation of dynamic property WP_Term::$term_order is deprecated in /homepages/9/d495490788/htdocs/ouradvanture.com/wp-includes/class-wp-term.php on line 198
Deprecated: Creation of dynamic property WP_Term::$cat_ID is deprecated in /homepages/9/d495490788/htdocs/ouradvanture.com/wp-includes/category.php on line 378
Deprecated: Creation of dynamic property WP_Term::$category_count is deprecated in /homepages/9/d495490788/htdocs/ouradvanture.com/wp-includes/category.php on line 379
Deprecated: Creation of dynamic property WP_Term::$category_description is deprecated in /homepages/9/d495490788/htdocs/ouradvanture.com/wp-includes/category.php on line 380
Deprecated: Creation of dynamic property WP_Term::$cat_name is deprecated in /homepages/9/d495490788/htdocs/ouradvanture.com/wp-includes/category.php on line 381
Deprecated: Creation of dynamic property WP_Term::$category_nicename is deprecated in /homepages/9/d495490788/htdocs/ouradvanture.com/wp-includes/category.php on line 382
Deprecated: Creation of dynamic property WP_Term::$category_parent is deprecated in /homepages/9/d495490788/htdocs/ouradvanture.com/wp-includes/category.php on line 383
Deprecated: Creation of dynamic property ET_Builder_Module_Helper_MultiViewOptions::$inherited_props is deprecated in /homepages/9/d495490788/htdocs/ouradvanture.com/wp-content/themes/Divi/includes/builder/module/helpers/MultiViewOptions.php on line 686
Deprecated: Creation of dynamic property ET_Builder_Module_Helper_MultiViewOptions::$inherited_props is deprecated in /homepages/9/d495490788/htdocs/ouradvanture.com/wp-content/themes/Divi/includes/builder/module/helpers/MultiViewOptions.php on line 686
Deprecated: Creation of dynamic property ET_Builder_Module_Helper_MultiViewOptions::$inherited_props is deprecated in /homepages/9/d495490788/htdocs/ouradvanture.com/wp-content/themes/Divi/includes/builder/module/helpers/MultiViewOptions.php on line 686
Deprecated: Creation of dynamic property ET_Builder_Module_Helper_MultiViewOptions::$inherited_props is deprecated in /homepages/9/d495490788/htdocs/ouradvanture.com/wp-content/themes/Divi/includes/builder/module/helpers/MultiViewOptions.php on line 686
Deprecated: Creation of dynamic property ET_Builder_Module_Helper_MultiViewOptions::$inherited_props is deprecated in /homepages/9/d495490788/htdocs/ouradvanture.com/wp-content/themes/Divi/includes/builder/module/helpers/MultiViewOptions.php on line 686
Deprecated: Creation of dynamic property ET_Builder_Module_Helper_MultiViewOptions::$inherited_props is deprecated in /homepages/9/d495490788/htdocs/ouradvanture.com/wp-content/themes/Divi/includes/builder/module/helpers/MultiViewOptions.php on line 686
Headliner Shelf - Sprinter Van Conversion
This project took a little bit of thought, what with angles and dangles. You will need
- Cardboard – needed to make a template for the angled corners.
- Plywood – needed for the shelf.
- Wood – used to make a lip for the shelf so your stuff will stay in place when driving.
- Fabric – used to cover the shelf.
- Glue – used to stick the fabric to the shelf.
- Screws and tools.
I decided the position of the shelf based around two factors
- Ease of moving from the cab to the living area and back with out bumping your head.
- Volume of storage space.
Once the location has been chosen put a mark on the headliner. From this mark measure the width at the back and front, I found that the headliner tappers in from the back.
Transfer these measurements to your plywood, I used a piece of cardboard as a template to work out the curvature to front part of the headliner, left and right. (A pencil and scissors will be needed for this part.) When happy with the cardboard templates, put them in position on your plywood with all the measurements then simply draw around the templates and then cut the wood. Some sanding will needed around the edges so the shelf will sit flush.
I fitted a lip to the shelf, simply cut a length of wood to size then glue and screw in position. I covered the shelf in a grey vinyl fabric to match the factory sprinter headliner colour, these seemed to work out OK.
When the time came to fit the shelf to the headliner I found it easer to remove the whole headliner from the van, doing so gave me access to the other side of the headliner, as I attached wooden mounting blocks to the shelf which allowed me to put screws into the mounting blocks through the headliner and then securely into block of wood to the back of the healiner. The end result is a very sturdy shelf for storing all sorts of stuff.
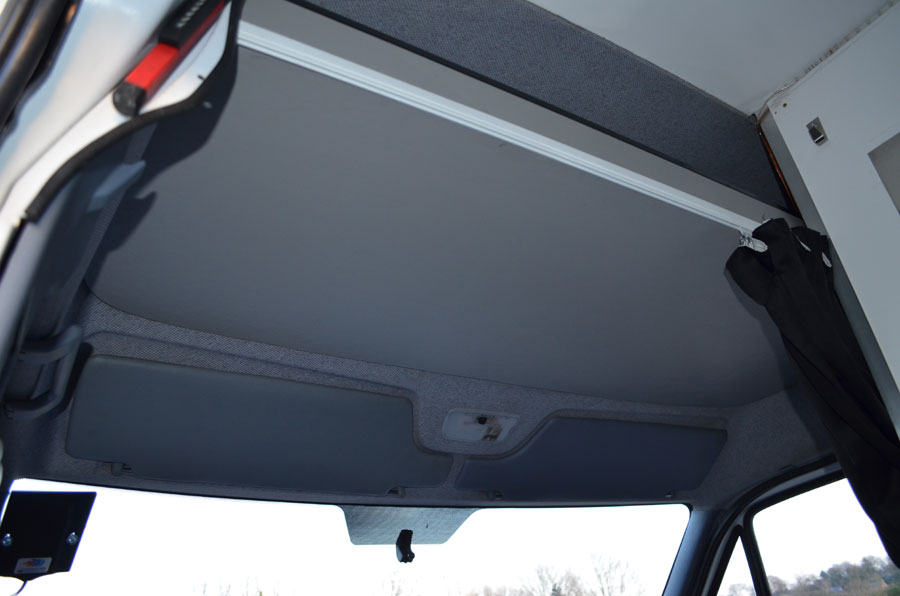
I glued a length of black plastic angle to both corners of the lip. The shelf also gives you a great place to run curtains that block the cab from the living space.

Deprecated: Creation of dynamic property WP_Term::$term_order is deprecated in /homepages/9/d495490788/htdocs/ouradvanture.com/wp-includes/class-wp-term.php on line 198
Deprecated: Creation of dynamic property WP_Term::$cat_ID is deprecated in /homepages/9/d495490788/htdocs/ouradvanture.com/wp-includes/category.php on line 378
Deprecated: Creation of dynamic property WP_Term::$category_count is deprecated in /homepages/9/d495490788/htdocs/ouradvanture.com/wp-includes/category.php on line 379
Deprecated: Creation of dynamic property WP_Term::$category_description is deprecated in /homepages/9/d495490788/htdocs/ouradvanture.com/wp-includes/category.php on line 380
Deprecated: Creation of dynamic property WP_Term::$cat_name is deprecated in /homepages/9/d495490788/htdocs/ouradvanture.com/wp-includes/category.php on line 381
Deprecated: Creation of dynamic property WP_Term::$category_nicename is deprecated in /homepages/9/d495490788/htdocs/ouradvanture.com/wp-includes/category.php on line 382
Deprecated: Creation of dynamic property WP_Term::$category_parent is deprecated in /homepages/9/d495490788/htdocs/ouradvanture.com/wp-includes/category.php on line 383
Deprecated: Creation of dynamic property ET_Builder_Module_Helper_MultiViewOptions::$inherited_props is deprecated in /homepages/9/d495490788/htdocs/ouradvanture.com/wp-content/themes/Divi/includes/builder/module/helpers/MultiViewOptions.php on line 686
Deprecated: Creation of dynamic property ET_Builder_Module_Helper_MultiViewOptions::$inherited_props is deprecated in /homepages/9/d495490788/htdocs/ouradvanture.com/wp-content/themes/Divi/includes/builder/module/helpers/MultiViewOptions.php on line 686
Deprecated: Creation of dynamic property ET_Builder_Module_Helper_MultiViewOptions::$inherited_props is deprecated in /homepages/9/d495490788/htdocs/ouradvanture.com/wp-content/themes/Divi/includes/builder/module/helpers/MultiViewOptions.php on line 686
Deprecated: Creation of dynamic property ET_Builder_Module_Helper_MultiViewOptions::$inherited_props is deprecated in /homepages/9/d495490788/htdocs/ouradvanture.com/wp-content/themes/Divi/includes/builder/module/helpers/MultiViewOptions.php on line 686
Deprecated: Creation of dynamic property ET_Builder_Module_Helper_MultiViewOptions::$inherited_props is deprecated in /homepages/9/d495490788/htdocs/ouradvanture.com/wp-content/themes/Divi/includes/builder/module/helpers/MultiViewOptions.php on line 686
Deprecated: Creation of dynamic property ET_Builder_Module_Helper_MultiViewOptions::$inherited_props is deprecated in /homepages/9/d495490788/htdocs/ouradvanture.com/wp-content/themes/Divi/includes/builder/module/helpers/MultiViewOptions.php on line 686
Overhead Cabinets - Sprinter Van Conversion
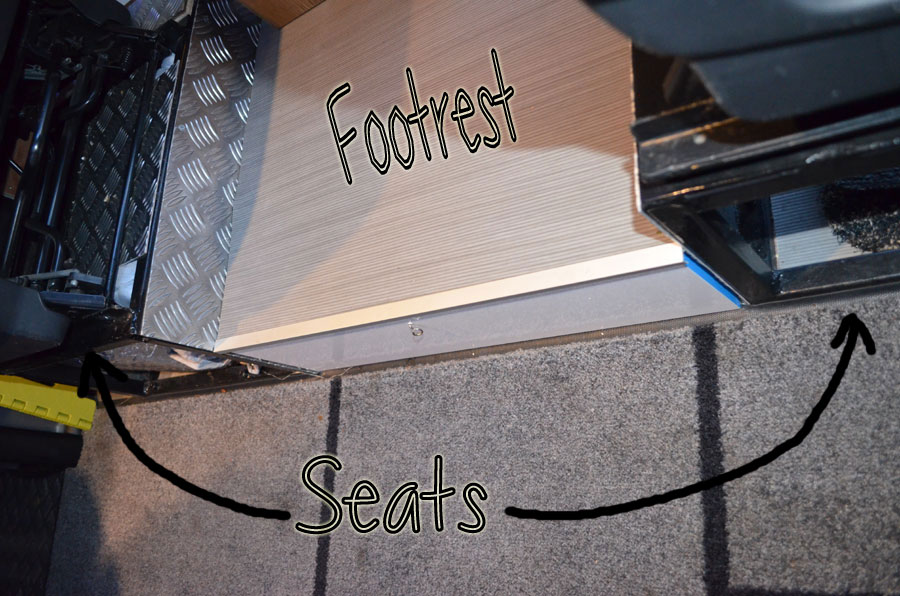
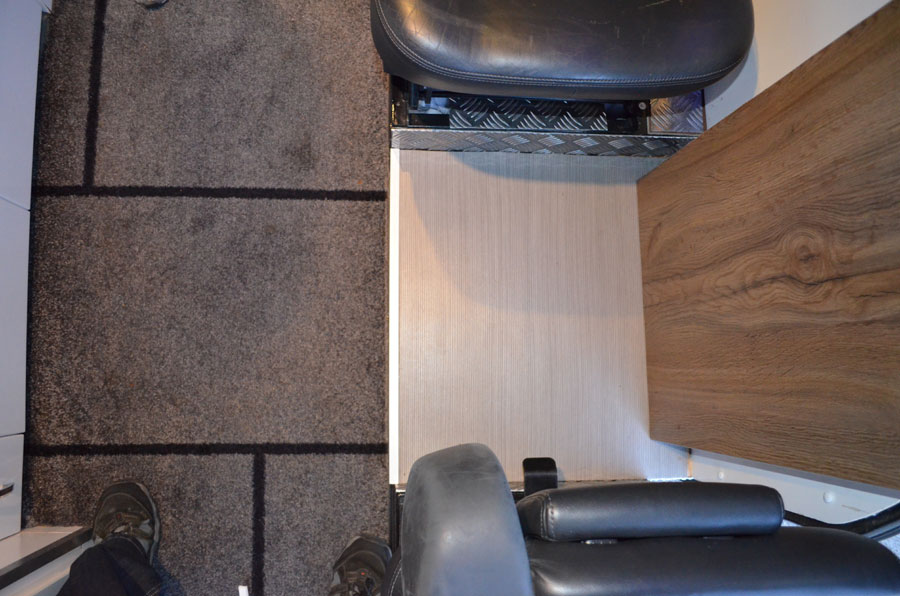
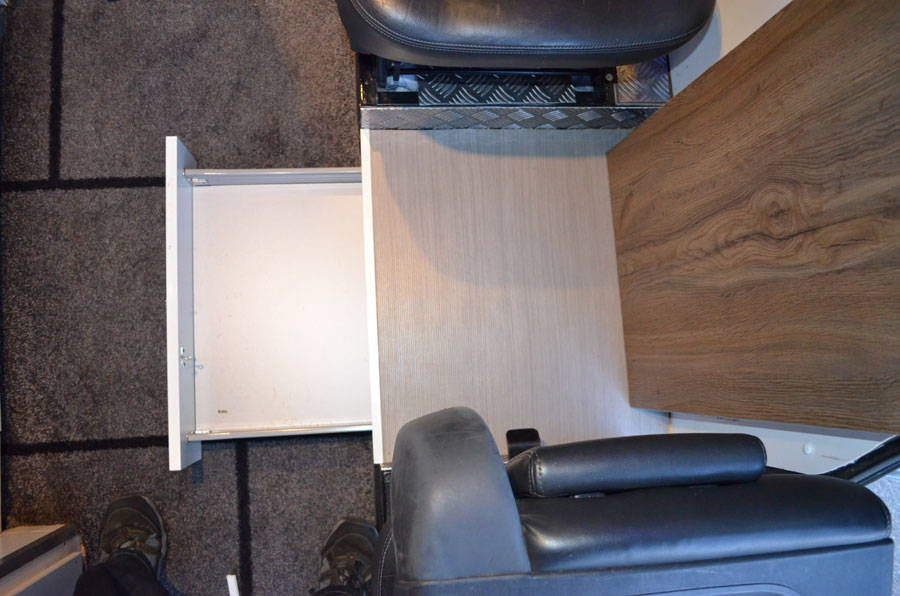
The plan here was keep it simple, four overhead cabinets and a draw between the two seats. (Not including the kitchen draws and cupboard.) I know this is not motorhome thing to do… We bought the cabinets from Ikea and modified the carcases to fit the angles of the van.
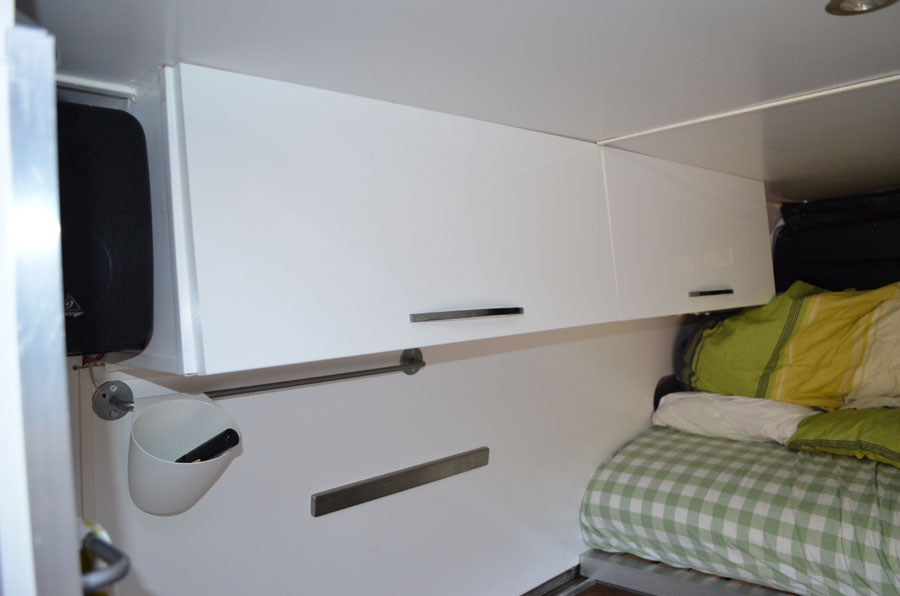
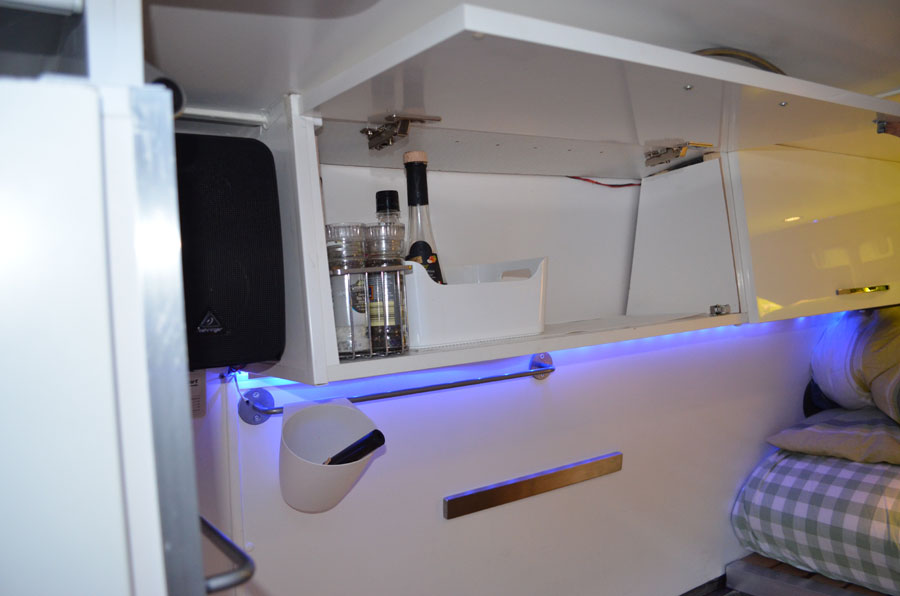
Finally a simple draw under the footrest between the two rear seats, you can read about these seats here.
Deprecated: Creation of dynamic property WP_Term::$term_order is deprecated in /homepages/9/d495490788/htdocs/ouradvanture.com/wp-includes/class-wp-term.php on line 198
Deprecated: Creation of dynamic property WP_Term::$cat_ID is deprecated in /homepages/9/d495490788/htdocs/ouradvanture.com/wp-includes/category.php on line 378
Deprecated: Creation of dynamic property WP_Term::$category_count is deprecated in /homepages/9/d495490788/htdocs/ouradvanture.com/wp-includes/category.php on line 379
Deprecated: Creation of dynamic property WP_Term::$category_description is deprecated in /homepages/9/d495490788/htdocs/ouradvanture.com/wp-includes/category.php on line 380
Deprecated: Creation of dynamic property WP_Term::$cat_name is deprecated in /homepages/9/d495490788/htdocs/ouradvanture.com/wp-includes/category.php on line 381
Deprecated: Creation of dynamic property WP_Term::$category_nicename is deprecated in /homepages/9/d495490788/htdocs/ouradvanture.com/wp-includes/category.php on line 382
Deprecated: Creation of dynamic property WP_Term::$category_parent is deprecated in /homepages/9/d495490788/htdocs/ouradvanture.com/wp-includes/category.php on line 383
Deprecated: Creation of dynamic property ET_Builder_Module_Helper_MultiViewOptions::$inherited_props is deprecated in /homepages/9/d495490788/htdocs/ouradvanture.com/wp-content/themes/Divi/includes/builder/module/helpers/MultiViewOptions.php on line 686
Deprecated: Creation of dynamic property ET_Builder_Module_Helper_MultiViewOptions::$inherited_props is deprecated in /homepages/9/d495490788/htdocs/ouradvanture.com/wp-content/themes/Divi/includes/builder/module/helpers/MultiViewOptions.php on line 686
Deprecated: Creation of dynamic property ET_Builder_Module_Helper_MultiViewOptions::$inherited_props is deprecated in /homepages/9/d495490788/htdocs/ouradvanture.com/wp-content/themes/Divi/includes/builder/module/helpers/MultiViewOptions.php on line 686
Deprecated: Creation of dynamic property ET_Builder_Module_Helper_MultiViewOptions::$inherited_props is deprecated in /homepages/9/d495490788/htdocs/ouradvanture.com/wp-content/themes/Divi/includes/builder/module/helpers/MultiViewOptions.php on line 686
Deprecated: Creation of dynamic property ET_Builder_Module_Helper_MultiViewOptions::$inherited_props is deprecated in /homepages/9/d495490788/htdocs/ouradvanture.com/wp-content/themes/Divi/includes/builder/module/helpers/MultiViewOptions.php on line 686
Deprecated: Creation of dynamic property ET_Builder_Module_Helper_MultiViewOptions::$inherited_props is deprecated in /homepages/9/d495490788/htdocs/ouradvanture.com/wp-content/themes/Divi/includes/builder/module/helpers/MultiViewOptions.php on line 686
Comfy Bed - Sprinter Van Conversion
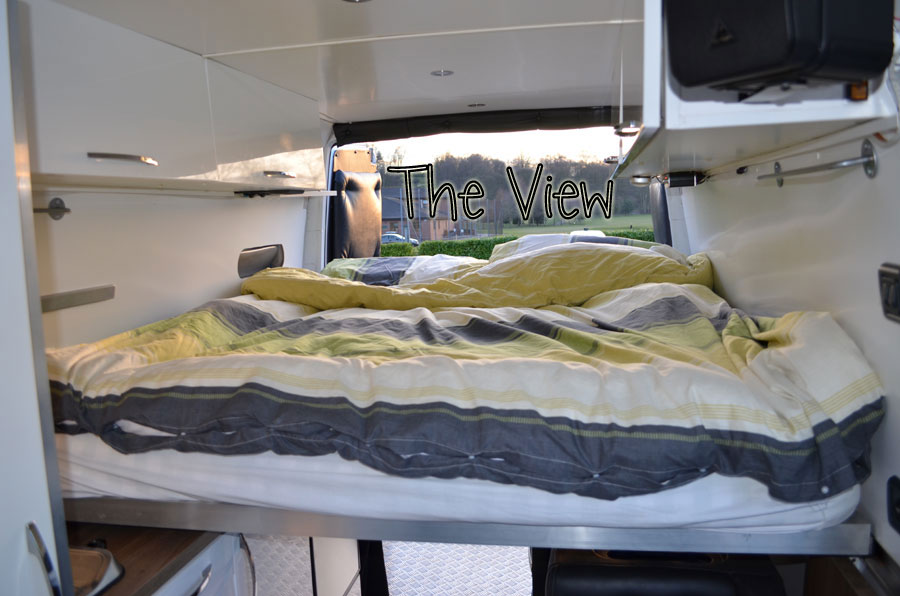
We wanted a large comfy bed, not always possible in space of 3 meters by 1.8 meters, if a shower and toilet room is planned. The solution we opted for was a raised slide out bed. Tried and tested guaranteed to work.
End result a large comfy bed that slides out over the kitchen and seating area, plus a large garage space. Downside when the beds out you lose your kitchen, table and chairs. But we still have access to the stove.
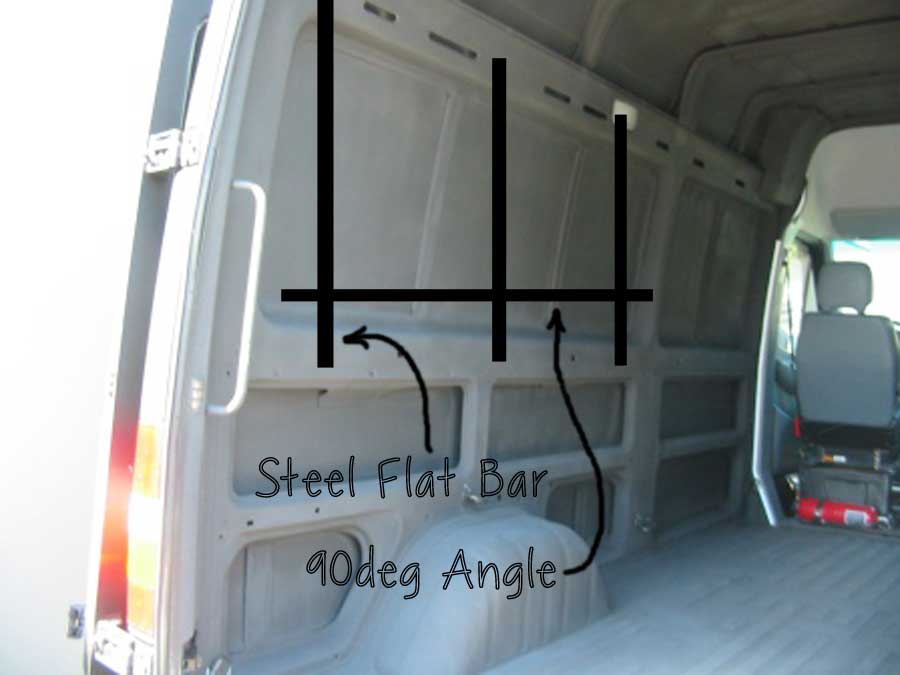
The construction is simple, a fixed section with a slide out part and bed slates. The slid out section runs on a metal frame which is welded to the ribs of the van.
On either side of the van I welded three steel flat bars to the side of the van. To the bars welded a length of steel angle.
The angle bar shown after the wall board fitted.
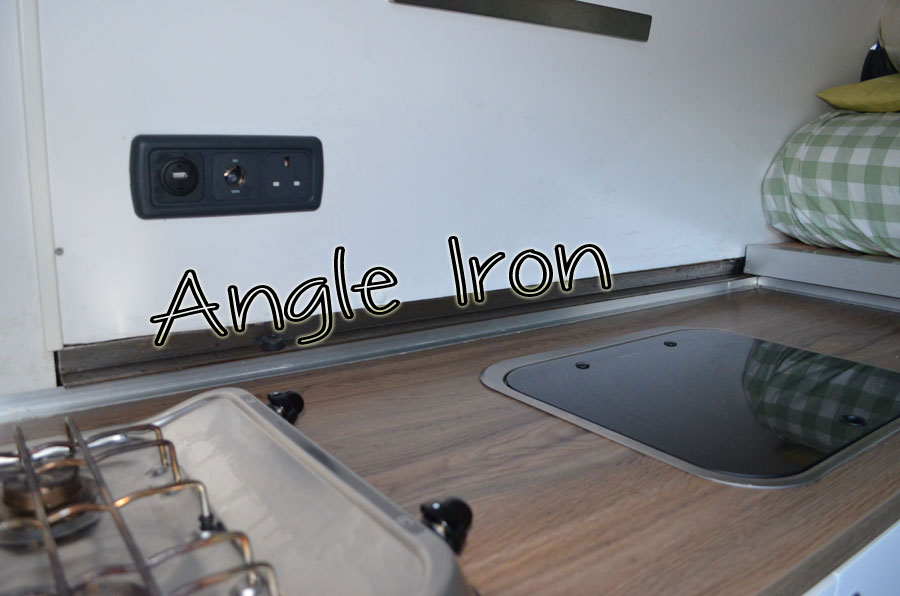
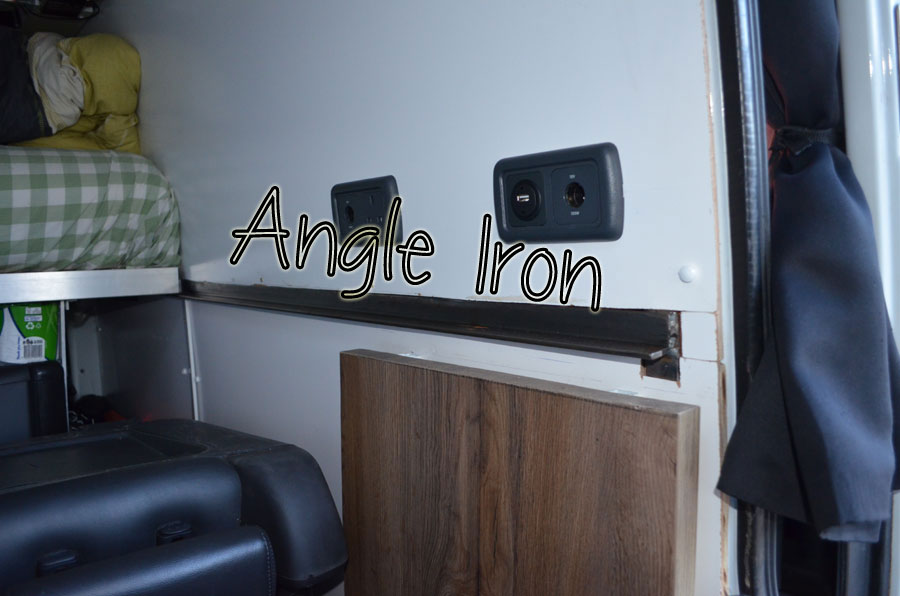
Followed by welding two box section tubes for the fixed part to the angle iron, a third tube for the slide out part.
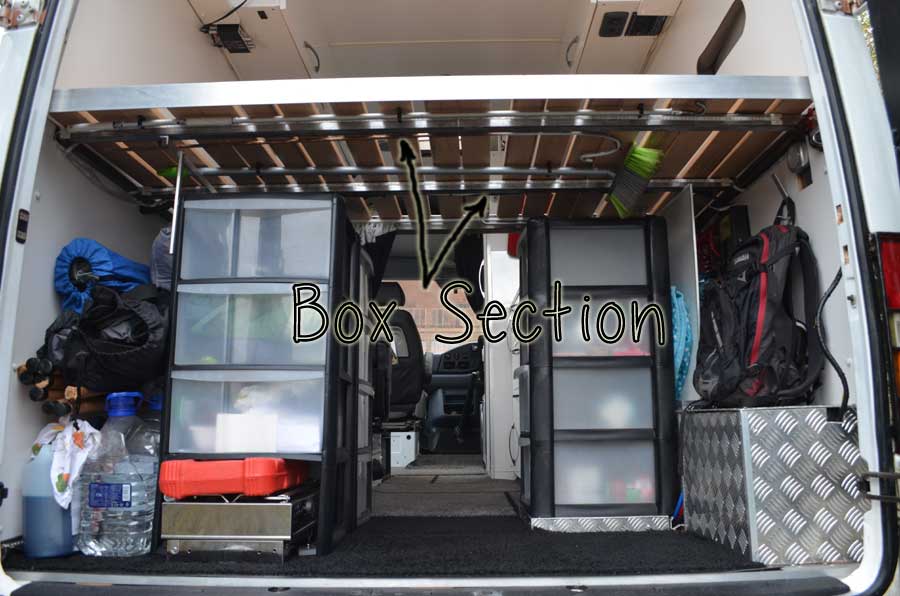
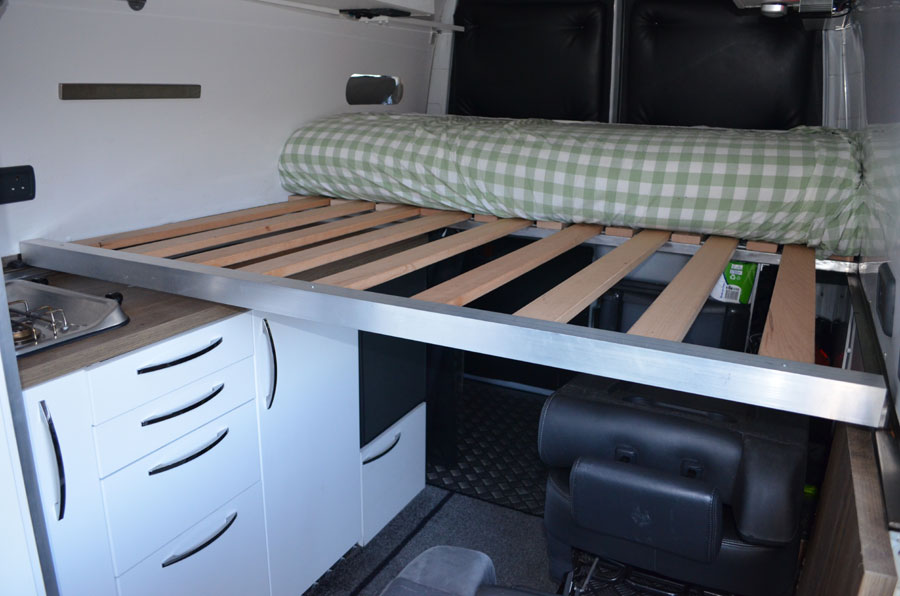
Now screw every alternative wooden slat to the fixed part to the box section and the reaming slats to the box section that slides out.
The bed pulled out with the mattress folded in the stored position. You can see how the slats slide together
The detailing where the slats are screwed to the slide out box section looks messy, to tidy this up I attached a length of aluminium angle.
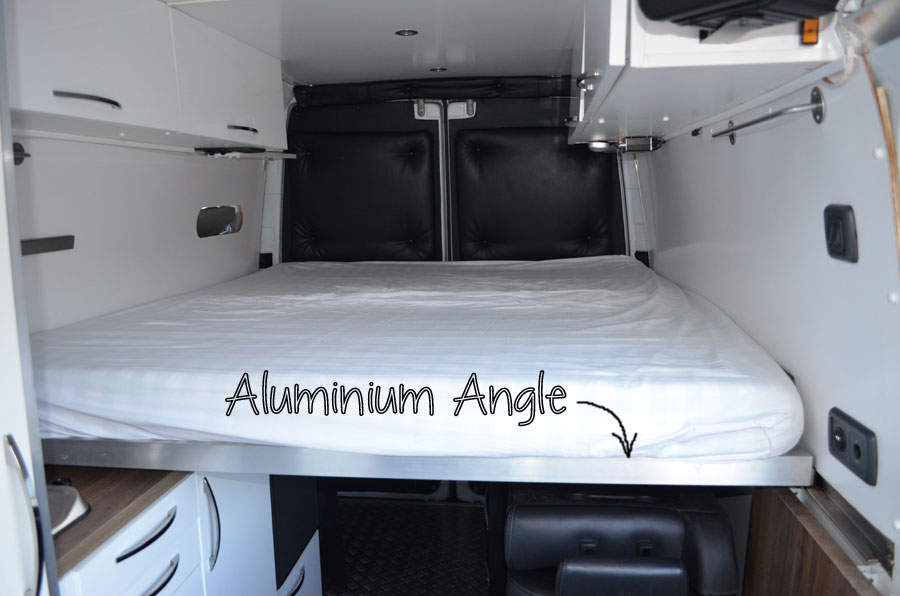
The mattress is super comfy, we brought it from Ikea – I think its called ‘Malfors’. A sharp bread knife trimed it to size, finally cut it in half so it folds over easily.